

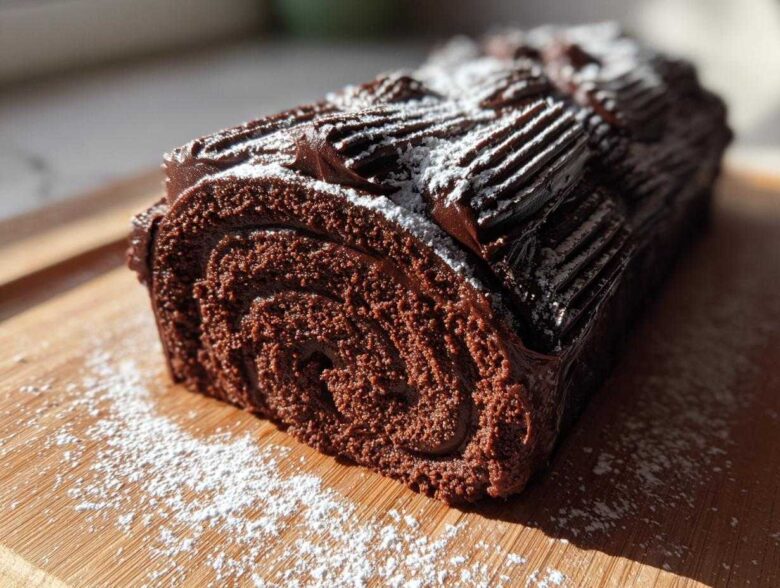
Listen up, if you’re hosting Christmas this year, you absolutely need something that screams ‘I tried!’ without making you cry over a cracked cake. Forget those store-bought things; we’re making a showstopper! I’ve tested every Swiss roll trick out there, and I finally cracked the code on making the perfect yule log cake that actually rolls up without shattering. Seriously, this guide shows you exactly how to manage that delicate sponge so you get that stunning, realistic log shape every single time. It’s easier than you think, I promise!
Why This Chocolate Yule Log Cake is Your Perfect Holiday Dessert Centerpiece
When you bring this cake out, people stop talking. That’s the magic of a true Showstopper Holiday Dessert! This isn’t just another grocery store chocolate cake; this is a handmade wonder that looks ancient and traditional but tastes incredibly fresh. I designed this recipe specifically so you don’t have to fear the roll.
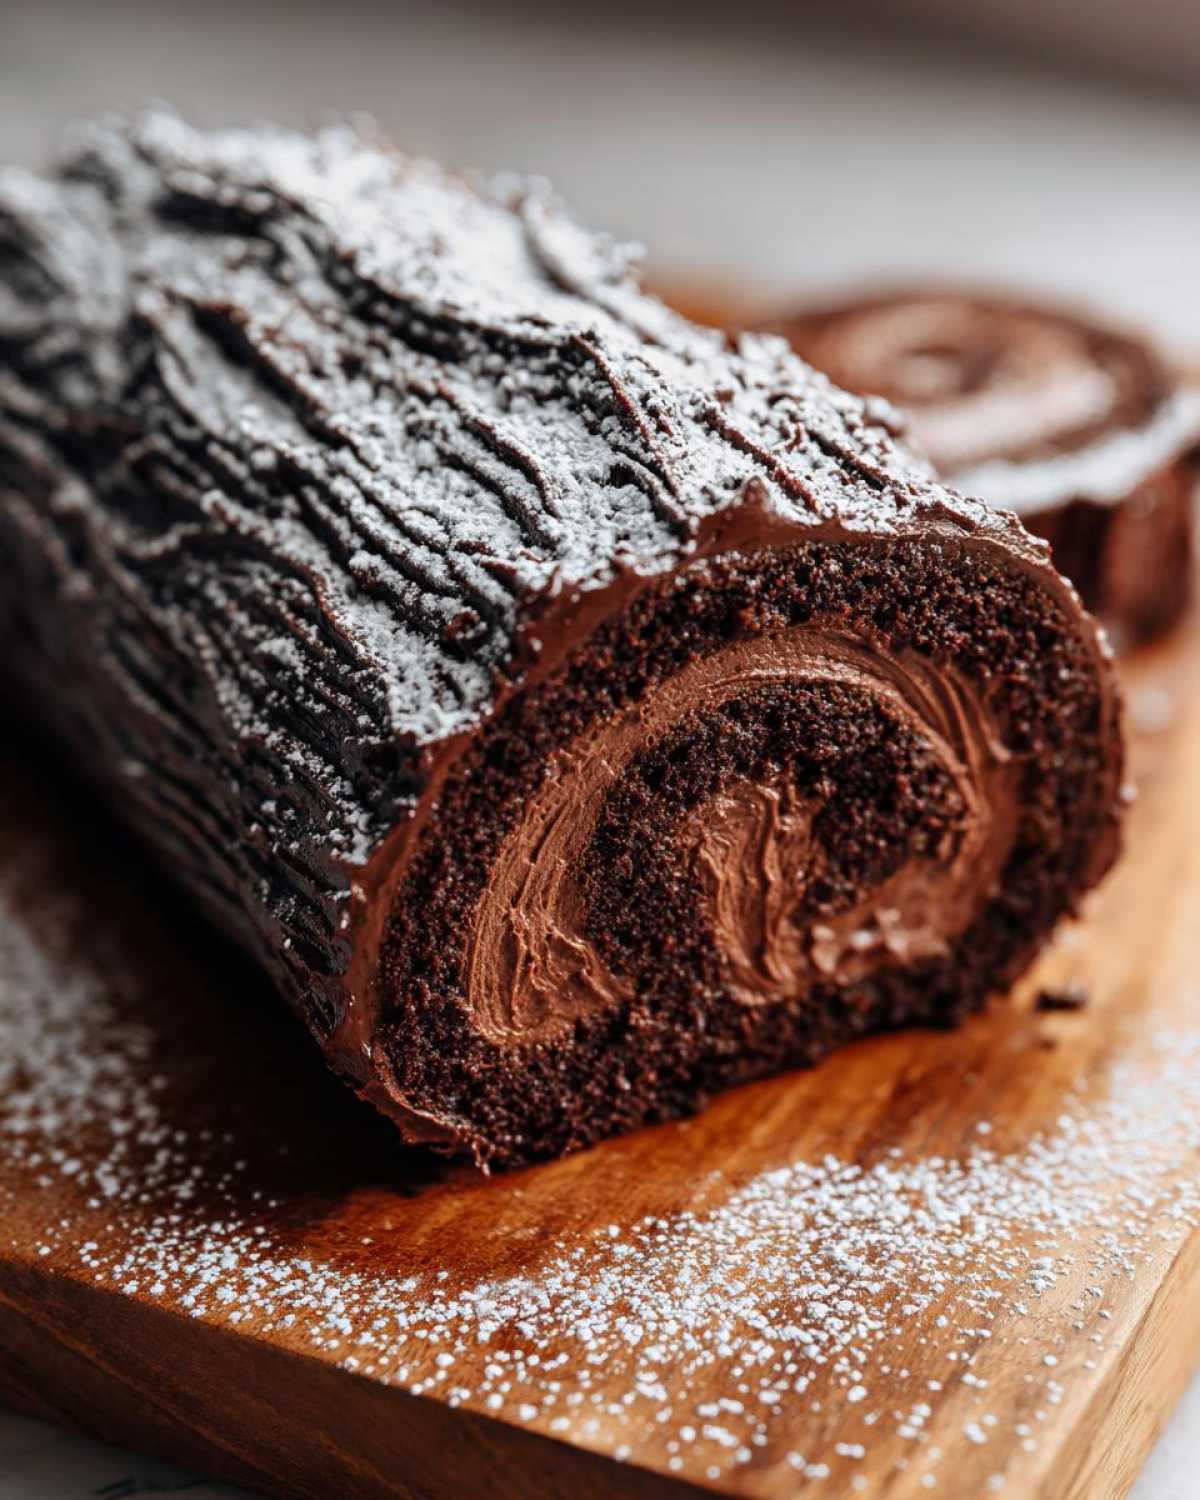
You get that incredible, tender sponge that melts in your mouth, paired with the deepest, richest chocolate buttercream you can imagine. Plus, we nail the visual elements—from the deeply scored bark texture to that perfect, snowy dusting on top. It means business for your Christmas table.
Key Benefits of Our Traditional Yule Log Recipe
- Incredibly tender and flexible sponge base, minimizing the chance of cracking.
- Deep, rich cocoa flavor in both the cake and the fluffy exterior frosting.
- Foolproof technique for achieving that realistic, textured tree bark look.
- It’s designed to be assembled in stages, making holiday baking less stressful!
Gathering Your Supplies for the Best Yule Log Recipe
Okay, baking is fun, but having the right gear makes it feel like cheating—in the best way possible! Before we even think about separating eggs, we need to make sure your kitchen is set up for success, especially with that ten-inch long cake we’re handling. Don’t try tackling this with a standard cookie sheet, trust me on this one; you’ll just stress yourself out!
Having these specific tools ready to go is what separates a slightly sad, cracked log from a gorgeous one. It’s all about preparation, which is half the battle in making any good Rolled Sponge Cake Recipe.
Essential Equipment for Your Yule Log Cake
- A 15×10 inch jelly roll pan. This exact size gives us the perfect thinness for rolling without breakage!
- A very clean, large bowl dedicated only to whipping egg whites. Any hint of grease means sad, flat whites.
- A box of good quality parchment paper. We need that overhang to lift the cake out later.
- Your offset spatula—you need this for smoothly spreading the frosting and truly nailing that bark texture!
- A sturdy, fine-mesh sieve or sifter for the cocoa powder. No lumps allowed in this recipe, ever.
- Measuring cups and spoons, naturally, but honestly, pay extra attention to the sugar measurements—they matter for the height of the sponge!
- A rolling pin! Wait, no, scratch that—we use a kitchen towel instead. See the next section for the crazy trick!
Ingredients for the Rich Chocolate Cake Holiday Sponge
Okay, now for the fun part—getting everything ready so we can bake! When it comes to a classic Rich Chocolate Cake Holiday sponge, you have to follow the recipe exactly. We aren’t making huge substitutions here because this delicate batter needs precision to puff up right before we roll it. Seriously, measure your cocoa powder twice!
We need two sets of ingredients: one for the unbelievably light sponge cake that rolls, and one for the decadent, sturdy buttercream that holds it all together and acts as our ‘bark.’ Don’t try to wing the quantities; they’re calculated for that perfect thinness.
For the Chocolate Swiss Roll Sponge
This is where the volume comes from, so those eggs need your undivided attention! Remember, we’re whipping the whites separately—that’s the whole structure of this **Chocolate Swiss Roll** base.
- Four large eggs, and I mean *large*. Crucially, they must be completely separated into two bowls—whites in one, yolks in the other.
- One half cup of standard granulated sugar, but we split this! Keep the half cup near the yolks, and save the remaining two tablespoons specifically for the egg whites.
- A quarter cup of basic all-purpose flour. Make sure it’s fluffed up before measuring.
- A quarter cup of *unsweetened* cocoa powder. This MUST be sifted right over the dry ingredients to avoid clumps.
- One teaspoon of pure vanilla extract.
- Just a tiny pinch of salt for the egg whites to help them stabilize.
For the Chocolate Buttercream Filling
This filling needs to be smooth enough to spread easily across the whole sheet but stiff enough to hold its shape when we score the bark. If your butter isn’t right, the whole frosting job goes sideways, so pay attention to the texture!
- One cup of unsalted butter that has been softened completely. Leave it out early! It has to be soft, but not greasy or melty looking.
- Two cups of powdered sugar (also called confectioner’s sugar). Make sure this is also sifted if it looks lumpy!
- A half cup of unsweetened cocoa powder. Again, sift this! We need zero grainy bits in our frosting.
- A quarter cup of heavy cream. This is what gives the filling its perfect spreadable texture.
- One teaspoon of vanilla extract for boosting the chocolate flavor.
How to Make Yule Log: Mastering the Rolled Sponge Cake Recipe
This is where we earn bragging rights! Making a **Bûche de Noël Recipe** doesn’t have to be a tightrope walk, but you have to respect the sponge. The whole goal here is to whip enough air into the eggs so the cake is lofty enough to bend, but not so delicate that it collapses when we try to roll it up with the filling inside. Pay close attention to the folding—that’s non-negotiable!
Preparing and Baking the Chocolate Base
First things first, get your oven humming at 375°F (190°C). You need to prep that 15×10 pan by lining it with parchment paper, making sure you have a little overhang on the long sides so you can actually lift the thing out later. Now, grab those yolks and beat them with the larger amount of sugar until they look pale lemon and feel thick when you lift the whisk. Then, gently fold in your sifted dry ingredients until *just* combined. I mean it—stop mixing the second you don’t see white streaks!
Separately, beat those egg whites until they look like stiff, glossy clouds—think perfect shaving cream. Now, go in slowly: fold about a third of those gorgeous whites into your chocolate base just to loosen it up. Then, carefully, gently, fold in the rest. You are not stirring; you are cutting down the center and sweeping up from the bottom. Once it’s uniform, spread it super evenly in your pan and bake it for just 10 to 12 minutes. It’ll spring back when it’s done—that’s your cue!
The Critical Step: Rolling the Warm Yule Log Cake
Time for our famous trick! While the cake is baking, lay out one of your cleanest, largest kitchen towels and dust it heavily, like a fresh snowfall, with powdered sugar. This sugar barrier is your cake’s best friend. As soon as the cake comes out of the oven—hot, hot, hot!—flip it right out of the pan onto that sugared towel. Peel off the parchment paper immediately. Starting from one of the short ends, roll the cake and the cloth together very snugly. You must roll it while it’s warm! Roll it up completely and set it on a cooling rack *still rolled up* in that towel. It needs to chill out and hold that coiled shape until it’s totally cool. This step is what prevents tears when you make your final yule log cake!
Making the Filling and Assembling the Christmas Log Cake
While your warm log cools inside its towel cocoon, whip up that amazing buttercream filling. Beat that softened butter until it’s creamy, then slowly stream in your sifted powdered sugar and cocoa, alternating with splashes of heavy cream and vanilla. Beat until it’s airy and perfect. Once your sponge is completely cool, carefully unroll it. Spread that rich frosting evenly over the top, leaving about an inch bare along the far edge. Now, re-roll it tightly, *this time without the towel*. Give that newly rolled **Christmas Log Cake** a good long chill in the fridge—at least an hour—so it sets up hard before we decorate it. Waiting now saves you so much heartache later!
Decorating a Yule Log: Creating Realistic Bark Texture
This is the moment you realize you didn’t just bake a cake; you made art! If you followed the chilling step above, your log should be firm enough to handle some serious styling. This part of making the yule log cake is my absolute favorite because it hides any minor imperfections from the rolling process. We’re turning our dessert into a gorgeous, natural centerpiece!
First things first: the branch. Take your chilled log and place it on the serving platter seam-side down. Now, grab a sharp knife and slice off about three inches from one end. Make that cut on an angle—not straight across! This slanted piece is your branch. Dab a little bit of extra buttercream on the main log where the branch will sit, and press that angled piece on top, creating a classic ‘Y’ shape with your log and branch.
Now, for the magic texture. Grab that offset spatula or even just a fork! Using short, deliberate strokes, start dragging the tines or the edge of the spatula across the surface of the buttercream that’s covering the entire log and the branch piece. You are deliberately trying to disrupt the frosting to mimic swirling wood grain and rough bark. Don’t worry about making it perfect; nature is messy, and so is good tree bark!
Once the texture is scored all over, it’s time for the snow effect. Get your powdered sugar ready. I like to use a very fine-mesh sieve, holding it high above the cake. Gently tap the side of the sieve so the sugar drifts down evenly over the whole **yule log cake**. Don’t dump it! You want a light, delicate drift, especially catching in the grooves of the bark texture we just made. If you have little meringue mushrooms or rosemary sprigs, tuck those around the base to look like moss or fungi growing on the log. It instantly elevates the whole look!
Tips for Success with Your yule log cake
Baking a showstopper deserves a few insider tricks, right? I’ve learned over the years that if you respect the temperature and texture of your ingredients, this **yule log cake** behaves beautifully. Don’t rush these cooling or creaming moments; they are key to avoiding the dreaded cracks and ensuring your chocolate buttercream is exactly what it needs to be for that perfect bark effect. Trust me, a little patience here is what makes the difference between a happy baker and a frustrated one!
A great tip I learned from my Aunt Clara: once the cake is filled and rolled (before the final chill), wrap it tightly in plastic wrap. This extra layer helps keep everything contained and ensures a super clean cut when you slice the ends and attach the branch piece later. It’s all about structure for the **yule log cake**!
Troubleshooting Common Issues in Festive Cake Baking
Sometimes things just don’t go to plan on the first try, or maybe your kitchen is just way warmer than mine! Here’s what to do when you run into trouble with your log.
- If the Sponge Tears While You’re Rolling: Don’t panic! This usually means the cake cooled down too much before it was rolled, or you didn’t dust the towel heavily enough. Once you have the tear, stop rolling immediately. Gently unroll it, spread a little extra buttercream right into the crack—the frosting acts like glue—and then re-roll it as smoothly as you can. You can always lean the damaged side against the serving plate later so it’s hidden!
- If the Buttercream is Too Soft to Score Bark: This is a classic issue, especially if your kitchen is warm! The buttercream needs to be firm enough to hold the ridges from the fork or spatula. If it’s too sloppy, simply pop the whole mixture into the fridge for 10 to 15 minutes. Beat it again briefly once it hardens up a bit. Cold buttercream is your best friend when you’re decorating and trying to keep sharp lines for the bark.
- If the Cake Won’t Stick When Attaching the Branch: If you’ve chilled the main log too long, the cold surface might reject the new frosting dab. Before you stick that branch piece on, use a tiny dab of warm water or a drop of milk on the application spot of the main log. This slight moisture helps the new buttercream grab onto the cold surface better. Remember, you can always use the powdered sugar snow to delicately hide the seam later!
Storage and Reheating Instructions for Your yule log cake
This stunning **yule log cake** is definitely a make-ahead marvel, which is why I love having it ready before the holiday rush hits! Because our filling is a rich buttercream, this cake absolutely thrives when stored cold. Think of it as a refrigerator cake—it needs that chill time not only to set the log shape perfectly but also for the flavors to really marry together.
When you store it, you want to cover it loosely with plastic wrap or put it under a cake dome. Don’t wrap it super tight right away if you just finished decorating, or you might smear your beautiful bark texture! You can certainly keep this masterpiece chilling for two or even three full days before your big Christmas gathering. That means you can focus on the turkey the day before!
Now, here’s the most important serving tip: You absolutely must take your **yule log cake** out of the fridge about 30 to 45 minutes before you plan to serve it. Slicing it when it’s rock hard leads to a crumbly slice, and the buttercream will taste too heavy. Letting it warm up just a tiny bit softens that chocolate filling just enough, making the sponge unbelievably tender and bringing out the deep chocolate flavor. Serving it slightly cool, not ice cold, is the key to making this the best cake of the season!
Frequently Asked Questions About the Bûche de Noël Recipe
I know you’ve got questions swirling around, especially after looking at that slightly scary rolling step! That’s totally normal. I get asked the same things every year when helping people tackle their first **Christmas Log Cake**. Let’s clear up the biggest head-scratchers so you feel totally confident standing over your baking station.
Can I make the yule log cake ahead of time?
Yes! This is actually encouraged for any great **Holiday Dessert Centerpiece**! My favorite way to manage the stress is to bake the sponge cake and let it cool completely in the towel roll the day before you plan to serve it. On Day One, you can unroll, fill it, re-roll it, and wrap it tightly for a good overnight chill. Then, on Day Two (Christmas morning, perhaps?), unwrap the firm log, do all your bark scoring and decorating, and pop it back in the fridge until serving time. It lets the chocolate flavor really bloom, too!
What is the secret to preventing the rolled sponge from cracking?
Ah, the million-dollar question! It all comes down to temperature and friction when you make your **Noel Cake Tutorial**. The secret isn’t a fancy ingredient; it’s the warm roll technique. You MUST invert the hot cake immediately onto that heavily powdered-sugar-dusted kitchen towel and roll it up while it’s steaming hot. The towel provides the structure, and the heat keeps the sponge flexible enough to bend around itself without snapping. Once it’s cool in that shape, the structure is set, and you can unroll it later for filling without much worry. Seriously, do not let it cool flat before rolling!
Another little trick for anyone nervous about their **Bûche de Noël Recipe** is to make sure you aren’t over-baking. If the cake bakes for even two minutes too long, it loses that vital moisture and becomes brittle. Stick to that 10-12 minute window!
If you’d like to check out our general baking guidelines or privacy details, you can always visit our policy page, but for now, let’s focus on making this the best cake ever!
Estimated Nutritional Information for This Winter Celebration Cake
Now, listen, I’m a baker, not a nutritionist, so please take these numbers with a giant grain of salt—or maybe a dusting of powdered sugar, that feels more appropriate for this amazing **Winter Celebration Cake**!
The data below is just an educated guess based on the standard ingredients we used, like the butter, the sugars, and the cocoa. If you went crazy with extra thick frosting or used different types of chocolate chips (which I won’t judge you for, honestly), these numbers will change a bit. But it gives you a rough idea of what you are feasting on!
These figures are calculated for one single slice, assuming this recipe yields exactly 10 servings, as written. If you cut bigger pieces—and let’s be honest, sometimes I do when nobody is looking—the nutritional value per slice will obviously increase.
- Serving Size: 1 slice
- Calories: 350
- Sugar: 35g
- Fat: 20g
- Saturated Fat: 12g
- Unsaturated Fat: 5g
- Trans Fat: 0g (We love that!)
- Carbohydrates: 40g
- Fiber: 2g
- Protein: 5g
- Cholesterol: 110mg
- Sodium: 50mg
I always say that if you have to ask about the calories in a homemade **Christmas Log Cake**, you’re clearly eating it for the right reasons—which is joy! Enjoy every single bite!
PrintClassic Chocolate Yule Log Cake (Bûche de Noël)
Follow these steps to create a traditional chocolate Yule Log Cake, featuring a tender sponge, rich chocolate buttercream, and realistic bark texture for a stunning holiday centerpiece.
- Prep Time: 45 min
- Cook Time: 12 min
- Total Time: 57 min
- Yield: 10 servings
- Category: Dessert
- Method: Baking and Rolling
- Cuisine: French
- Diet: Vegetarian
Ingredients
- 4 large eggs, separated
- 1/2 cup granulated sugar, plus 2 tablespoons for egg whites
- 1/4 cup all-purpose flour
- 1/4 cup unsweetened cocoa powder
- 1 teaspoon vanilla extract
- Pinch of salt
- 1 cup unsalted butter, softened
- 2 cups powdered sugar
- 1/2 cup unsweetened cocoa powder, sifted
- 1/4 cup heavy cream
- 1 teaspoon vanilla extract
- Powdered sugar for dusting
Instructions
- Preheat your oven to 375°F (190°C). Line a 15×10 inch jelly roll pan with parchment paper, letting the paper overhang slightly on the long sides.
- In a large bowl, beat the egg yolks with 1/2 cup sugar until pale and thick. Whisk in 1 teaspoon vanilla extract.
- Sift the flour and 1/4 cup cocoa powder together over the yolk mixture. Gently fold until just combined. Do not overmix.
- In a separate clean bowl, beat the egg whites with the salt until soft peaks form. Gradually add the remaining 2 tablespoons of sugar and beat until stiff, glossy peaks form.
- Gently fold one-third of the egg whites into the chocolate batter to lighten it. Then, gently fold in the remaining egg whites until no white streaks remain.
- Spread the batter evenly into the prepared pan. Bake for 10 to 12 minutes, or until the top springs back lightly when touched.
- While the cake bakes, lay a clean kitchen towel on your counter and dust it heavily with powdered sugar.
- Immediately invert the hot cake onto the sugared towel. Peel off the parchment paper. Starting from a short end, roll the cake and towel together tightly. Let it cool completely in this rolled shape on a wire rack.
- To make the filling, beat the softened butter until creamy. Gradually add the powdered sugar and 1/2 cup cocoa powder, alternating with the heavy cream and 1 teaspoon vanilla extract, beating until smooth and fluffy.
- Once cool, carefully unroll the cake. Spread the chocolate buttercream evenly over the surface, leaving a 1-inch border on the far edge.
- Re-roll the cake tightly, without the towel, starting from the same short end. Wrap the rolled cake tightly in plastic wrap and chill for at least 1 hour to set the shape.
- To assemble the log, place the cake seam-side down on your serving platter. Cut a 3-inch piece from one end at an angle to create a branch piece. Place this branch piece on top of the main log, securing it with a dab of buttercream.
- Use a fork or a small offset spatula to score the remaining exterior buttercream to resemble tree bark texture.
- Dust the entire cake generously with powdered sugar to mimic snow. Slice the ends of the log and branch pieces at an angle to enhance the log look if desired. Chill until ready to serve.
Notes
- To prevent the sponge from cracking when rolling, ensure the cake is still warm when you first roll it in the towel.
- If the buttercream seems too soft for decorating, chill it for 10 minutes before applying it to the cake.
- For a more realistic look, use a small, clean paintbrush to gently feather the scored bark lines.
Nutrition
- Serving Size: 1 slice
- Calories: 350
- Sugar: 35
- Sodium: 50
- Fat: 20
- Saturated Fat: 12
- Unsaturated Fat: 5
- Trans Fat: 0
- Carbohydrates: 40
- Fiber: 2
- Protein: 5
- Cholesterol: 110