

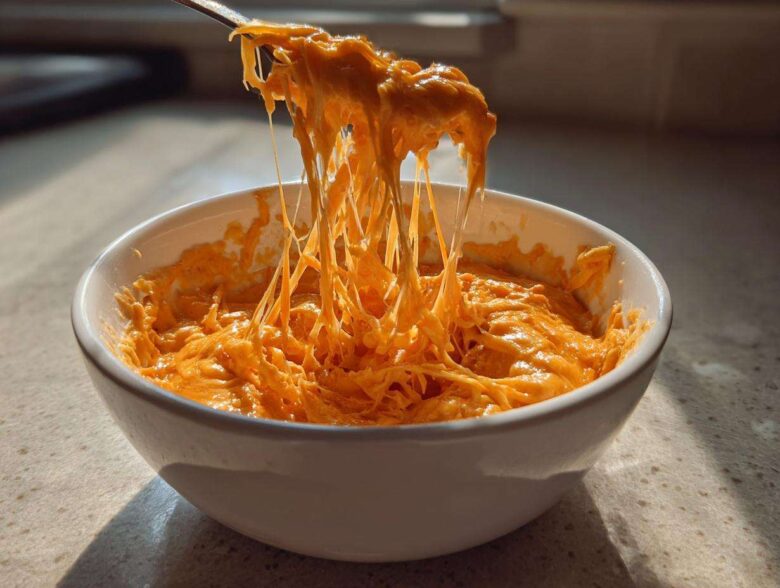
If you’re anything like me, hosting means you need three things: easy cleanup, minimal fuss, and something that disappears instantly. I have spent way too many Sundays stressing over complicated party food, only to realize everyone just wants to stand around the snack table. That stops now! I’m going to let you in on my absolute secret weapon for any gathering, whether it’s game day or just Tuesday night: the Easiest 3-Ingredient Creamy Chili Cheese Dip. Seriously, you’ll have this hot, cheesy masterpiece ready to go in under 20 minutes, and it tastes like it took hours. Trust me, I’ve tested every dip variation known to humankind, and this one always wins crowd approval.
Since I learned this magic trick years ago, I’ve never looked back. It’s dependable, super budget-friendly, and it sets up beautifully. We always have too many appetites to feed, so recipes like this one let me focus on greeting guests instead of standing over the stove. You can even sneak in quick references to other great appetizer recipes, like my famous sausage balls, while you’re getting this dip ready!
Why This 3-Ingredient Chili Cheese Dip Is Your New Party Staple
Listen, friends, you need something that tastes indulgent but doesn’t cost you your entire afternoon tending the oven. This recipe is pure genius because it hits all the right notes for entertaining. It’s quick, it’s cheesy, and it’s almost impossible to mess up, which is why I always turn to it when things get busy.
- It’s just three core ingredients, so shopping is a breeze!
- It comes together on the stovetop in mere minutes—truly one of the best Quick Appetizer Dips out there.
- It is the ultimate Crowd Pleaser Dip; I promise you’ll watch the bowl empty fast.
Perfect for Game Day and Super Bowl Snacks
When the game is on, the last thing you want is complicated cooking. This dip just needs medium-low heat and a little stirring. Plus, because it’s mostly on the stovetop, cleanup is basically just washing one little saucepan. You serve it straight from a bowl, so no messy casserole dishes to worry about when you’re focused on the score!
Gathering Ingredients for Your Easy Chili Cheese Dip Recipe
The beauty of this recipe, the one that makes it one of my favorite dip recipes for potluck, is how few things you actually need. We’re sticking to the rule of three here! You’ll need cream cheese—and make sure it’s the full 8 ounces and actually softened, please!—one can of quality chili, and some nice shredded cheddar. That’s it to create this fantastic chili cheese dip base.
Ingredient Notes and Substitution Tips for Chili Cheese Dip
A few pointers to make sure this works perfectly: always go for beanless chili if you can find it! Beans tend to get a little mushy and throw off the velvety texture we’re aiming for with this chili cheese dip. Also, use a good sharp cheddar for flavor. If you only have Monterey Jack or Pepper Jack on hand, that works too, but the sharpness in cheddar really cuts through the richness.
Step-by-Step Guide to Making the Quick Appetizer Dips
Alright, let’s get this party started! This is truly the simplest way to make a decadent chili cheese dip on the stovetop. Since we need things smooth and fast, having your cream cheese completely softened is the secret weapon here. I mean truly soft, not just “it’s been on the counter for an hour” soft. Pull it out early!
First step is easy: toss that soft cream cheese and your canned chili right into a medium saucepan. Then, turn the heat low—we’re talking medium-low, not scorching! You must stir this mixture constantly, scraping the bottom so nothing sticks or burns. Keep stirring until it’s a totally uniform, gooey base. You might want to check out making some homemade naan for dipping while this warms up!
Once the chili and cheese are blended, that’s when you add your shredded cheddar. Stir that in steadily until every last bit has melted and you have that beautiful, stretchy, hot dip. Pour it straight into your serving bowl, and you are done! That’s how you get the best game day dip ready in 15 minutes flat.

Achieving the Ultimate Creamy Chili Dip Texture
The absolute number one rookie mistake people make is adding the shredded cheese when the base isn’t quite hot enough, or they try to rush it over high heat. High heat will make your cheddar seize up and turn grainy—and nobody wants chunky dip when they are looking for ultimate creaminess!
My tip, which is frankly essential, is to make sure you can almost mush the cream cheese through the holes of a fork when you press it before you even start cooking. That perfect texture comes from letting the dairy melt slowly and gently incorporate. If you’re patient with the melting stage, the cheddar will follow suit beautifully, and you’ll end up with that perfect velvety coating you crave.
Equipment Needed for the Best Game Day Dip
Honestly, if you have a kitchen drawer, you probably have everything required for this simple stovetop dip. We aren’t breaking out the stand mixer or the immersion blender for this one—that would defeat the purpose of keeping things quick!
What you absolutely need handy are just a few basics:
- A medium saucepan. Nothing massive, just big enough to comfortably hold your cream cheese, chili, and cheese without it threatening to boil over.
- A sturdy rubber spatula or a wooden spoon. You need something that won’t scratch your pan when you’re stirring constantly.
- A decent serving bowl. Since this chili cheese dip is best served hot, you might want a bowl that keeps heat well, or even better, transfer it right to a tiny mini slow cooker if you have one ready to go!

That’s literally it! No fancy gadgets required for this super straightforward dip. Short equipment lists mean less to wash later, which is always a win in my house.
Tips for Success When Preparing Your Chili Cheese Dip
Even though this is the easiest recipe ever—like, my toddler could technically manage the stirring with supervision—there are always those small nuances that separate a good dip from an incredible, smooth, velvety dip. We want zero graininess and maximum dipping potential here! These few tips should ensure your chili cheese dip is absolutely perfect every single time you make it, which I predict will be often.
First off, let’s talk about that cheddar cheese again. If you buy the block and shred it yourself, you win. Pre-shredded cheeses are coated with anti-caking agents, and those agents fight hard against creating that super smooth melt you want. If you must use pre-shredded, try sprinkling in just a quarter cup at a time, stirring until fully melted before adding the next bit. It takes patience, but it saves you a potential texture disaster!
My other big piece of advice deals with temperature control, especially after it comes off the heat. If you’re bringing this to a friend’s house or you want it to sit out for a few hours (like during a big football game), don’t just let it turn into a cold brick! I absolutely swear by transferring this dip to a small slow cooker. Just set it on the ‘Keep Warm’ setting. This keeps the chili cheese dip perfectly molten without continuing to cook it or causing it to separate. Plus, it looks fantastic on a serving table!
Finally, if you’re worried about the dip looking “thin” right when you take it off the stove, don’t panic! It will thicken up considerably once it hits the serving bowl and cools down just a hair. If you’re making a big batch for a potluck, you might even want to let it sit for five minutes before calling it done. It just needs that tiny bit of rest to settle into its final, perfect, dipping consistency.
Storage and Reheating Instructions for Leftover Chili Cheese Dip
Okay, let’s be honest, there’s rarely actual *leftover* chili cheese dip because this stuff disappears so fast, but if you manage to have some, you’ll want to store it correctly so it’s just as good the next day!
The key here is getting it cooled down and sealed up properly. Don’t leave it sitting on the counter once it’s no longer piping hot. Transfer any remaining dip into a sturdy, airtight container. I usually use one of my glass storage containers with a snap-on lid. It keeps it fresh in the fridge for about four or five days—though honestly, I doubt it lasts that long!
When you’re ready for round two? Reheating is super easy. You have two great options here. If you just want a quick bowl—maybe for a late-night snack—the microwave works wonders. Just scoop out what you need into a microwave-safe bowl, heat it in 30-second bursts, and stir vigorously between each burst. Stirring is important! It brings back that smooth texture we worked so hard for.
If you’re planning to serve it again for guests or just want that slow, gentle warmth restored, take it back to the stovetop. Put it in your same trusty saucepan over the absolute lowest heat setting. Warm it gently, stirring every minute or so, until it’s completely smooth and creamy again. If it seems a little thick after reheating—which can happen as the cheese base settles—just stir in a tiny splash of milk or even water until you reach back to that scoopable, glorious consistency your chili cheese dip had before!
Serving Suggestions for This Hot Cheesy Dip
Okay, we’ve mastered the dip, now we need the perfect vehicle to get that creamy goodness from the bowl to your mouth! While my chili cheese dip is absolutely built to be scooped up by heavy-duty, restaurant-style tortilla chips (the ones that don’t break the second you look at them!), limiting yourself to just chips is just a crying shame.
This dip is so rich and flavorful; it deserves a whole spread of dippers. Think about who you’re serving. If you have a super casual crowd focused on game day grub, stick to the classics. But if you’re serving it up for a slightly nicer gathering, mix it up a little!

Here are my favorite things to put out next to that warm bowl:
- Tortilla Chips: Must be sturdy! Always have a big basket of these.
- Thick-Cut Crackers: Wheat crackers or even those buttery Ritz-style ones scoop up this dip beautifully.
- Veggies for Crunch: Celery sticks are mandatory because the cool, watery crunch is a perfect counterpoint to the hot cheese. Carrot sticks work great too, but make sure they are crisp!
- Soft Bread Dippers: You can’t go wrong with small cubes of toasted baguette or chunks of soft pita bread. If you’re feeling ambitious, you could even make my easy olive oil bread and serve the dip right alongside it for ultimate dipping action!
- Fries: Don’t knock it till you try it! Pouring a little dip over oven-baked sweet potato fries when no one is looking is my favorite secret snack.

You want variety! Having options means everyone finds something they love, and it stretches the dip further if you happen to have a huge crowd that day. Just make sure whatever you choose is relatively thick—this isn’t a light dip; it needs something strong to hold all that cheesy chili goodness!
Frequently Asked Questions About Our 3 Ingredient Cheese Dip
I know that even with the best, fastest recipe, people always have questions! It’s smart to ask before you start mixing, especially when you’re planning for a big crowd. I’ve answered the ones I get asked the most about using this simple recipe—and yes, I’ll be sure to mention the primary keyword, chili cheese dip, in case you didn’t already know how much I love it!
You might also want to check out my guide for the easiest chocolate mug cake if you need a lightning-fast dessert option after everyone has demolished the dip!
Can I make this chili cheese dip in a slow cooker?
Oh yes, you absolutely can! That’s one of the hidden gems of this recipe, making it the perfect party appetizer idea because it can cook itself once the initial mixing is done. You can absolutely turn this into a Slow Cooker Chili Dip. Just mix your softened cream cheese and chili together in the slow cooker insert first, heat it on low until mostly melted, then stir in the cheddar until smooth. Once it’s hot, switch it to the ‘Keep Warm’ setting, and it will happily sit there waiting for hungry guests all afternoon! It’s fantastic for keeping that chili cheese dip perfectly hot and ready to scoop.
What is the best kind of chili to use for this dip?
This is a question I get all the time when people are planning their perfect chili cheese dip! My honest, firm advice is to use chili that has no beans. Why? Because when you gently melt these ingredients together for a wonderfully creamy texture, the beans just don’t play nice. They can create lumps, disrupt the smooth flow, and honestly, they just taste a bit off when they aren’t simmering in a big pot of soup.
If you use a good quality, beanless canned chili, your dip will be velvety smooth—almost like a queso, but heartier! If you absolutely adore beans, use a very finely chopped bean chili and stir it in very slowly with the shredded cheese. But for the *best* texture payoff, stick to no beans!
Estimated Nutritional Data for Chili Cheese Dip
Now, I know what you’re thinking. This is pure, unadulterated, cheesy comfort food, so naturally, it’s not exactly diet fare! But hey, when you’re having a party or watching the big game, you need to know what you’re serving. I pulled the numbers together based on the standard ingredients listed for this chili cheese dip. Remember, this is just a guide, so treat these numbers as a fun suggestion rather than hard science!
The estimates below are for one single serving size (which is 1/6th of the entire batch). If you are having a big crowd, people usually take smaller amounts, so you might end up with more servings, which helps spread those calories around!
- Calories: 280
- Fat: 22g
- Saturated Fat: 13g
- Carbohydrates: 6g
- Protein: 14g
- Sodium: 650mg (Yep, it’s salty, blame the cheese!)
If you are whipping this up for a holiday event, it’s always a good idea to have some lighter options available, too. You can see my thoughts on handling nutrition and recipes over on my disclaimer page, where I talk more about how these ingredient calculations work out for quick snack recipes like this one!
The bottom line is that this hot cheesy dip is delicious, and knowing the facts doesn’t stop me from serving it up warm with a big bowl of crackers. Enjoy responsibly!
PrintEasiest 3-Ingredient Creamy Chili Cheese Dip

Make this simple, creamy chili cheese dip in under 20 minutes using only three ingredients. It is perfect for game days and parties.
- Prep Time: 5 min
- Cook Time: 10 min
- Total Time: 15 min
- Yield: 6 servings
- Category: Appetizer
- Method: Stovetop
- Cuisine: American
- Diet: Vegetarian
Ingredients
- 1 (8 ounce) package cream cheese, softened
- 1 (15 ounce) can chili (no beans preferred)
- 1 cup shredded cheddar cheese
Instructions
- Combine the softened cream cheese and chili in a medium saucepan.
- Heat over medium-low heat, stirring constantly until the mixture is smooth and fully combined.
- Stir in the shredded cheddar cheese until it melts completely and the dip is smooth and hot.
- Transfer the dip to a serving bowl. Serve immediately with tortilla chips or crackers.
Notes
- For a thicker dip, reduce the amount of chili slightly.
- If you prefer a spicier dip, use hot chili or add a dash of hot sauce before serving.
- You can keep this dip warm in a small slow cooker on the ‘Keep Warm’ setting for parties.
Nutrition
- Serving Size: 1/6 of recipe
- Calories: 280
- Sugar: 4
- Sodium: 650
- Fat: 22
- Saturated Fat: 13
- Unsaturated Fat: 9
- Trans Fat: 0.5
- Carbohydrates: 6
- Fiber: 1
- Protein: 14
- Cholesterol: 60