

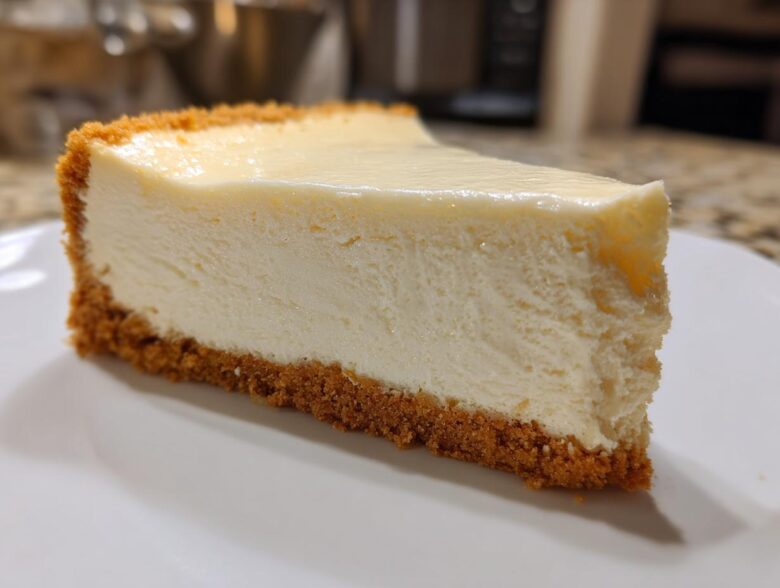
Listen, I totally get it. Making a truly creamy white chocolate cheesecake feels like you need a chemistry degree and a dedicated water bath situation just to keep it from cracking into a million dry pieces. Well, put down that roasting pan full of hot water! I’m here to tell you that I’ve finally cracked the code. This is hands-down the Best, Super Creamy No-Water Bath White Chocolate Cheesecake Recipe you will ever make. After way too many sad, cracked desserts, I figured out the slow cooling technique that makes all the difference. I learned so much about loving the process by reading about other bakers on our mission page, and now I can share that mastery with you. Trust me, once you nail this easy dessert, you won’t go back. It’s seriously decadent!
Why This Is the Ultimate White Chocolate Cheesecake Recipe
You deserve a cheesecake that doesn’t fight you every step of the way, right? This white chocolate cheesecake recipe is my absolute favorite because it gets incredible results without the headache. I mean, who wants to mess around with carefully sealed foil pans over a hot water bath? Not me! I want that rich, velvety texture, and I want it without stress.
Here’s why this batch always comes out perfectly for me:
- It’s outrageously creamy—the kind of bite that just melts away.
- Zero water bath required! Seriously, we skip that fuss entirely.
- The pure, sweet flavor of the white chocolate really shines through.
Achieving a Smooth Cheesecake Filling Without Complications
The secret to that flawless surface and texture is actually super simple: temperature. If your cream cheese is cold, your filling will be lumpy, no matter how powerful your mixer is. You have to let those blocks soften completely so they blend smoothly right from the start. When you mix gently and don’t whip too much air in, you avoid those pesky cracks or a curdled appearance later on. It’s all about gentle incorporation, not high-speed chaos!
Ingredients for the Best White Chocolate Cheesecake
Okay, let’s talk about what goes into making this amazing dessert. I know ingredient lists can look boring, but trust me on these requirements! If you skip the good stuff or don’t check the temperature of your dairy, you’re going to have a bad time later trying to fix a lumpy batter. We want precision here, because we are skipping the water bath!
For the Graham Cracker Crust
The foundation needs to be sturdy, so grab exactly what you need:
- 1 1/2 cups graham cracker crumbs (Please, measure these after crushing—don’t use pre-measured cups!)
- 1/4 cup granulated sugar
- 6 tablespoons unsalted butter, melted (This needs to be good quality butter, not that watery stuff. It holds everything together!)
For the Creamy White Chocolate Cheesecake Filling
This mixture is where all the magic happens. If you see white chocolate melting instructions anywhere else, forget them—we are melting ours gently so it doesn’t scorch. And those three blocks of cream cheese? They need to be room temperature, people!
- 3 (8 ounce) packages cream cheese, fully softened to room temperature. This is non-negotiable for that smooth texture.
- 1 1/2 cups granulated sugar
- 1 teaspoon vanilla extract
- 1/4 cup all-purpose flour (It’s a small amount, but it helps stabilize the filling beautifully.)
- 4 large eggs, added one at a time
- 12 ounces good quality white chocolate, melted and slightly cooled. Don’t use chips if you can avoid it; use good bars!
- 1/2 cup sour cream (This gives us that lovely little bit of tang and keeps the richness from being overwhelming.)
Step-by-Step Guide to Making Your White Chocolate Cheesecake from Scratch
Alright, this is where we turn those beautiful ingredients into a showstopping dessert! Don’t panic when you see the timing; most of it is hands-off waiting time. Since we are aiming for the best white chocolate cheesecake, we have to be precise with our oven game, especially since we are avoiding that messy water bath. Trust me, the slow cooldown process is absolutely key to getting that flawless texture we want. If you want to start looking at some other amazing dessert ideas while things bake, feel free to check out the main site!
Preparing the Crust and Oven Setup for Baked Cheesecake Recipe
First things first: get that oven warming up to 325 degrees F. Now, grab your 9-inch springform pan. This is the most important prep step for skipping the water bath! Take heavy-duty aluminum foil and wrap the entire outside bottom of the pan—I mean really tightly. We need to make a waterproof shield here. Then, mix your crust ingredients and press them firmly into the bottom. Pop that crust into the preheated oven for just 10 minutes. You want it set, not browned. Pull it out and let it cool down a little while you get the filling ready.
Mixing the Decadent White Chocolate Dessert Batter
Get your stand mixer (or hand mixer) ready. Start by beating that softened cream cheese until it looks absolutely lump-free. Scrape those sides down, you don’t want any hiding! Next, slowly beat in the sugar and the flour until they just disappear. Remember what I said about not overmixing? This is where it matters! Add the eggs one at a time. Seriously, just until you see the yolk vanish into the batter, then stop. Finally, gently fold in that slightly cooled, melted white chocolate and the sour cream. You want this batter to look rich and shiny—the hallmark of a decadent white chocolate dessert!
The No Water Bath Cheesecake Trick: Baking and Slow Cooling
Pour that gorgeous filling into your crust and give the pan a couple of gentle taps on the counter to pop any big air bubbles—this stops internal cracking! Bake it for about 55 to 65 minutes. You are looking for the edges to be firm, but when you gently nudge the pan, the center two inches should still have a little wobble, like perfect soft jelly. Once that happens, turn the oven OFF. Here’s our big secret for a perfect white chocolate cheesecake without a water bath: Prop the oven door open about two inches, maybe using a wooden spoon handle to keep it steady. Leave the cheesecake inside that cooling oven for a full hour. This gradual temperature drop is what prevents the drastic shrinking that causes cracks. After an hour of slow cooling, take it out, let it finish cooling on the counter, and then chill overnight. Perfection!
Tips for the Perfect Smooth Cheesecake Filling
Seriously, if you take nothing else away from this whole guide, remember this: texture is everything when you’re striving for that incredible white chocolate cheesecake experience. You want it smooth, not grainy, and certainly not bumpy!
The number one thing I obsess over is ingredient temperature. Your cream cheese absolutely must be softened enough to mash easily with a fork—we’re talking room temperature, not just slightly warm. If it’s cold, those smooth lumps just won’t break up, and all your effort goes to waste.
Also, pay attention to that beautiful white chocolate. Don’t blast it on high heat in the microwave! It scorches faster than you can say “Oops!” Use short, 30-second intervals, stirring well between each one. When you finally fold that melted chocolate and the sour cream into the batter, do it gently, just until it’s combined. That careful handling ensures your final product is the creamy white chocolate cheesecake masterpiece you deserve.
Variations on Your White Chocolate Cheesecake
Once you’ve mastered the base recipe, which I guarantee you will because we skipped the water bath drama, the fun really begins! This rich white chocolate cheesecake is practically begging for some colorful additions. Fruit is my go-to way to dress this dessert up, especially when I need something truly elegant for a dinner party. It’s so easy to turn this into a stunning centerpiece dessert!
If you’re aiming for that wonderful zing to cut through all that luxurious sweetness, I heartily recommend trying a fruit swirl. The recipe notes mentioned how simple it is to whip up a quick puree. Imagine that bright ruby red against the creamy, pale yellow of the cheesecake—it’s just gorgeous.
Making a White Chocolate Cranberry Cheesecake for the Holidays
When the weather turns cold and the holiday lights go up, this base recipe transforms beautifully into a showstopping dessert. For a festive holiday white chocolate cheesecake, skip the raspberry puree and go straight for cranberries! They give you that perfect tartness that screams winter celebration.
Here’s my method: Take about a half-cup of fresh or frozen cranberries, toss them with a tablespoon of sugar and a tiny splash of water, and simmer them gently until they just start to burst and thicken slightly. You don’t want a full, syrupy sauce; you want texture.
When you pour your batter into the crust, dollop the warm cranberry mix right on top strategically. Use a butter knife or skewer to gently drag it down into the batter—don’t mix it completely! You only want about three or four clear, bright swirls visible. Bake it exactly as the main recipe dictates. When it sets, you’ll have these beautiful streaks of festive color, making it look super professional, even though it was so easy!
Storage and Serving Suggestions for Your Creamy White Chocolate Cheesecake
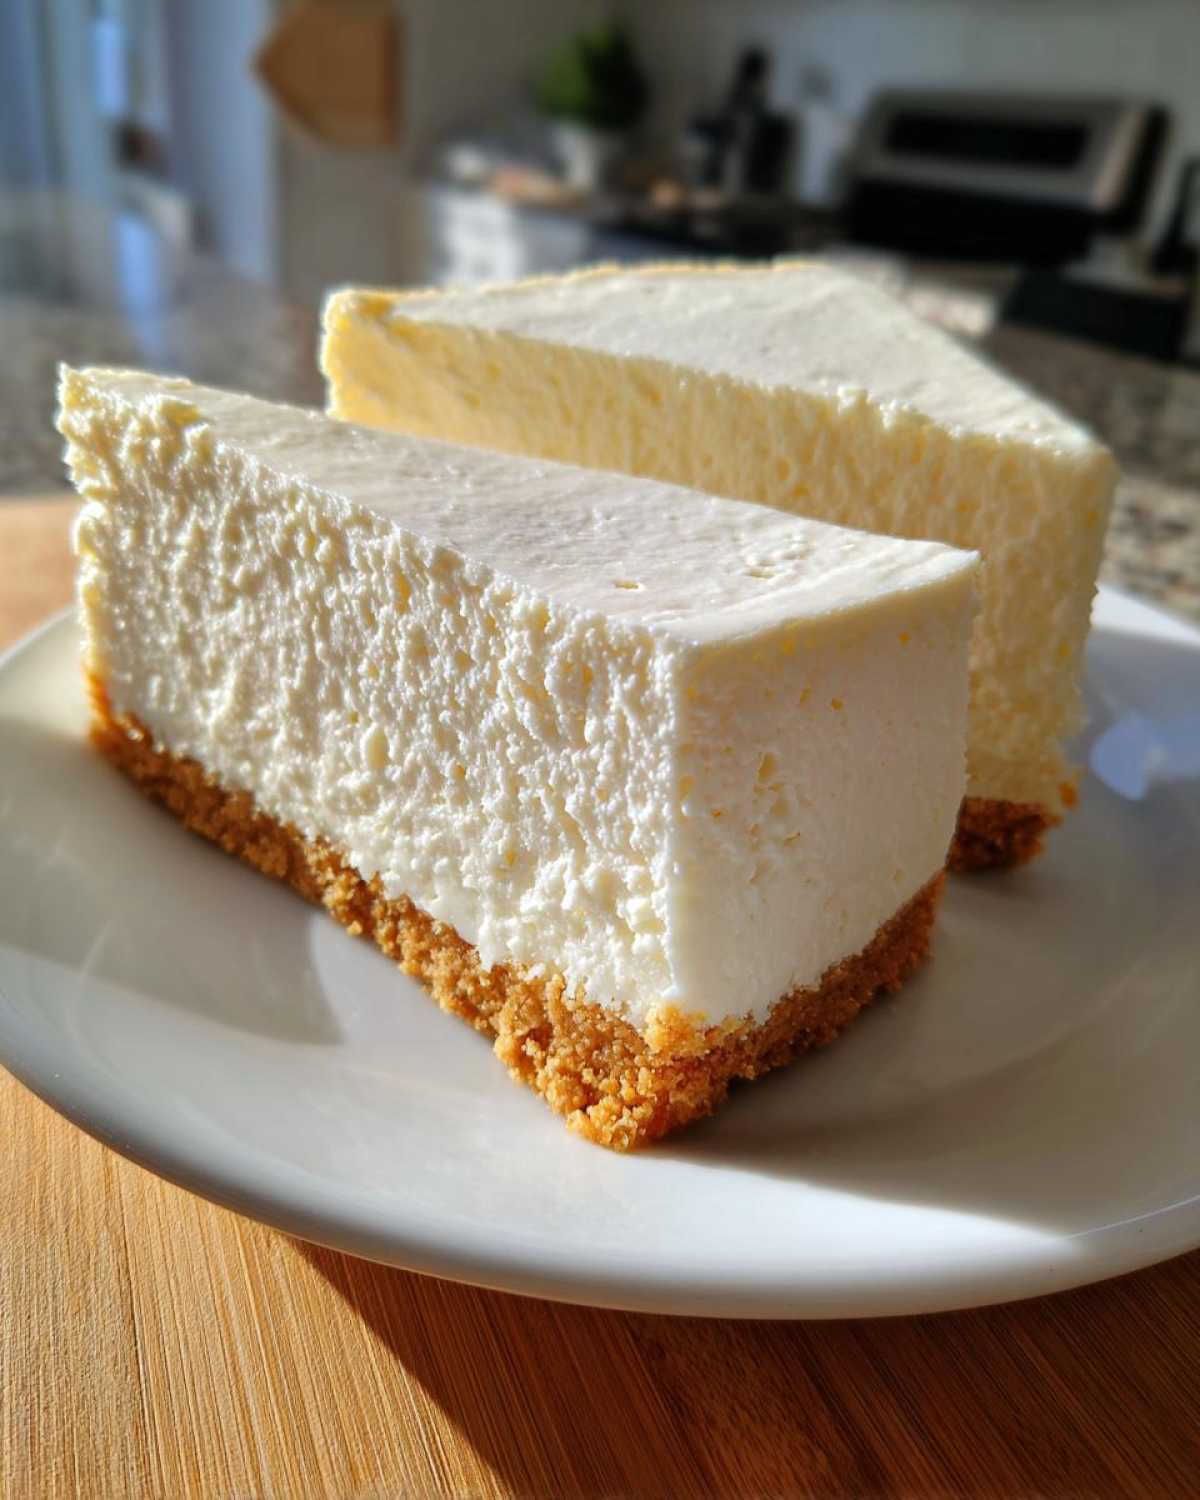
Now for the hardest part of this entire process: waiting! I know you want to dive right in with a fork the second that cooling cycle finishes, but resist the urge! For the very best results, you need to give your creamy white chocolate cheesecake time to truly set up. That smooth, velvety texture we worked so hard for won’t happen until it’s properly chilled.
I absolutely insist on chilling this cheesecake for a minimum of six hours, but honestly? Over an entire night in the refrigerator is where the flavor deepens and the texture firms up perfectly. Once it’s fully chilled, you can carefully unlatch the springform sides. This is tricky, so make sure you run a thin, warm knife around the edge first to release it gently from the sides without scraping the beautiful exterior.
When it comes to storage, keep it simple. Cover the exposed top loosely with plastic wrap—make sure the wrap isn’t touching the surface! If you’re worried about it drying out, you can gently tent the whole pan (with the sides detached) with foil. It will keep beautifully in the fridge for up to five days. Yes, five days of leftover decadent dessert!
As for serving, take it out of the fridge about 20 to 30 minutes before you plan to slice into it. Serving cheesecake straight from the cold fridge can make the texture feel a little too firm. That little bit of resting time at room temperature allows those fats and cream cheese to soften up just slightly, maximizing that luxurious, melt-in-your-mouth sensation. Then slice it with a hot knife—dip your serving knife in hot water and wipe dry between every cut—and enjoy the fruits of your no-water-bath labor!
Frequently Asked Questions About This White Chocolate Cheesecake Recipe
I know you might have some lingering questions, especially if you’ve wrestled with cheesecake recipes before! It’s totally normal. Cheesecake making can feel fussy, but I promise this method is pretty straightforward. Fire away with your worries—I’m happy to help clear up any confusion so you can make your next batch of this dessert without stress!
Can I make this an easy white chocolate cheesecake (no-bake)?
While this recipe is already an easy dessert idea because we skip the water bath, it is specifically designed as a *baked* cheesecake. If you’re absolutely set on a no-bake version, you can’t use these exact ingredients because the raw eggs and flour won’t set correctly when chilled. For a true no-bake version, you’d need different stabilizers, usually involving a lot more gelatin or whipped cream folded in. My advice? Stick with this baked one for the most authentic, creamy white chocolate cheesecake texture. The baking and slow cooling are what give you that incredible filling!
Why did my cheesecake crack even though I let it cool slowly?
Argh, that happens sometimes, even to the best of us! If you’ve followed the turning-off-the-oven trick and it still cracked, there are usually two culprits. First, were your eggs truly just incorporated? If your batter was over-mixed after the eggs went in, you packed too much air into it, and that air expands and then contracts too rapidly when cooling. Second, check your cream cheese temperature again. If it wasn’t perfectly soft, the batter gets tight quickly. If you need a quick fix for already cracked slices, just whip up a simple topping—a simple chocolate ganache or some fresh berries always hide those imperfections beautifully!
Can I use different cookies for the crust instead of graham crackers?
Oh, absolutely! I love mixing it up sometimes. Graham crackers offer a neutral, slightly sweet base, but you can totally experiment with different cheesecake crust ideas. Shortbread cookies work incredibly well—they make the crust a bit richer and buttery. Vanilla wafers are another fantastic choice, especially if you plan on swirling in raspberry puree later! Just make sure you crush them super fine and you’ll need roughly the same amount (1 1/2 cups of crumbs total). Don’t cook that alternative crust for longer than 10 minutes!
How long do I really need to chill the final white chocolate cheesecake?
I mentioned overnight, and I really mean it! When you’re aiming for the best white chocolate cheesecake that’s thick, firm, and utterly smooth, you simply cannot rush the chill time. Six hours is the absolute minimum okay, but 12 hours is the golden standard. This allows the fat in the cream cheese and white chocolate to fully solidify around the structure, giving you those clean, elegant slices you see in pictures. Resist the temptation!
Estimated Nutritional Data for This Decadent Dessert
Now, before you dig into this amazing decadent dessert, I always like to give everyone a little heads-up about the nutrition side of things. Baked cheesecakes, especially ones loaded with cream cheese and good quality white chocolate, are definitely an indulgence! These numbers are just ballparks, okay? They’re based on the ingredients listed and spread across 12 slices, but if you use a slightly different brand of cream cheese or sprinkle on extra toppings, those numbers might shift a bit.
Think of this as a guide, not a strict ruling. These estimates are based on one slice of the delicious, smooth cake we made:
- Calories: Around 450 (It’s rich, remember?)
- Fat Content: About 30 grams, with 18 grams being saturated fat—that’s where all that creamy body comes from!
- Carbohydrates: Around 45 grams, which includes the sugar from the crust and the filling.
- Protein: A solid 8 grams per slice, thanks to all that dairy goodness.
If you want to check out the full breakdown, including cholesterol and sodium, you can always find my full legal disclosure statement over on the site here. But honestly? When this white chocolate cheesecake is this good, I try not to dwell too much on the numbers until after I’ve had my second slice!
Share Your Ultimate White Chocolate Cheesecake Experience
Okay, you’re done! You’ve navigated the slow cooling, you’ve waited the agonizing overnight chill, and now you have the most luxurious, creamy, amazing cheesecake sitting in your fridge. I genuinely cannot wait to hear about it!
This is the part where we all build our baking community together. Did you manage that perfect slice? Did the edges stay firm while the middle melted in your mouth? I need all the details! Please, take a photo of your beautiful creation—maybe you added some fresh berries, or perhaps you kept it plain and elegant—and share it in the comments below.
Leaving a rating (five stars if you agree this is the best ever!) helps other folks know they can trust this method, especially the no-water-bath trick. Knowing that this recipe brought a little bit of decadent joy to your table means the world to me.
Don’t be shy about asking follow-up questions down there, either. If something unexpected happened during your bake, let’s troubleshoot it together so we can all learn for next time. Happy baking, and seriously, send me pictures!
PrintSuper Creamy No-Water Bath White Chocolate Cheesecake
A recipe for a rich, smooth white chocolate cheesecake that bakes perfectly without needing a water bath.
- Prep Time: 25 min
- Cook Time: 65 min
- Total Time: 100 min
- Yield: 12 servings
- Category: Dessert
- Method: Baking
- Cuisine: American
- Diet: Vegetarian
Ingredients
- 1 1/2 cups graham cracker crumbs
- 1/4 cup granulated sugar
- 6 tablespoons unsalted butter, melted
- 3 (8 ounce) packages cream cheese, softened
- 1 1/2 cups granulated sugar
- 1 teaspoon vanilla extract
- 1/4 cup all-purpose flour
- 4 large eggs
- 12 ounces good quality white chocolate, melted and slightly cooled
- 1/2 cup sour cream
Instructions
- Preheat your oven to 325 degrees F. Wrap the outside bottom of a 9-inch springform pan tightly with heavy-duty aluminum foil.
- Combine graham cracker crumbs, 1/4 cup sugar, and melted butter. Press the mixture firmly into the bottom of the prepared springform pan. Bake the crust for 10 minutes. Remove from the oven and let it cool slightly.
- In a large bowl, beat the softened cream cheese with an electric mixer until smooth. Scrape down the sides of the bowl.
- Gradually beat in 1 1/2 cups sugar, vanilla extract, and flour until just combined. Do not overmix.
- Beat in the eggs one at a time, mixing only until each egg is incorporated.
- Gently fold in the melted white chocolate and sour cream until the batter is uniform.
- Pour the filling over the cooled crust. Tap the pan gently on the counter a few times to release large air bubbles.
- Bake for 55 to 65 minutes. The edges should look set, but the center 2 inches should still have a slight jiggle.
- Turn off the oven. Prop the oven door open slightly (about 2 inches) using a wooden spoon. Let the cheesecake cool inside the oven for 1 hour. This slow cooling prevents cracking.
- Remove the cheesecake from the oven and let it cool completely on a wire rack.
- Once cool, cover the pan loosely with plastic wrap and refrigerate for at least 6 hours, or preferably overnight, before serving.
Notes
- For the smoothest texture, ensure your cream cheese is fully softened to room temperature.
- Melt the white chocolate gently using a double boiler or in short bursts in the microwave to prevent scorching.
- If you want a fruit swirl, reserve about 1 cup of the plain filling, swirl in 1/2 cup of raspberry puree into the main batter, then dollop the reserved filling on top and swirl lightly before baking.
Nutrition
- Serving Size: 1 slice
- Calories: 450
- Sugar: 40
- Sodium: 250
- Fat: 30
- Saturated Fat: 18
- Unsaturated Fat: 12
- Trans Fat: 0
- Carbohydrates: 45
- Fiber: 1
- Protein: 8
- Cholesterol: 110